-
Notifications
You must be signed in to change notification settings - Fork 455
Getting started Scenario 2 Onboard module library and CI environment
The repository is built so that you can create your own 1:1 instance and thus reuse the same concepts and features in your own environment, such as GitHub.
This requires several steps:
- Configure your Azure environment
- Fork/clone the repository into your DevOps environment
- Configure the CI environment
- Manual dependencies
- (Optional) Convert library to ARM
Depending on the DevOps environment you choose (GitHub or Azure DevOps), make sure you also account for the specific requirements outlined below.
CARML tests the deployments and stores the module artifacts in an Azure subscription. To do so, it requires a service principal with access to it.
In this first step, make sure you
- Have/create an Azure Active Directory Service Principal with at least
Contributor&User Access Administratorpermissions on the Management-Group/Subscription you want to test the modules in. You might find the following links useful: - Note down the following pieces of information
- Application (Client) ID
- Service Principal Object ID (not the object ID of the application)
- Service Principal Secret (password)
- Tenant ID
- Subscription ID
- Parent Management Group ID
Note: The Service Principal must be able to query its own details in the Azure Active Directory (AAD). To that end, ensure it has at least the (default) role 'Cloud application administrator'.
Next, you'll want to create your own copy of the code. Depending on the repository environment you want to use (GitHub or Azure DevOps), the setup will be slightly different.
Note: Whether you chose GitHub or Azure DevOps as your repository's environment, it does not affect your options when registering the pipelines.
Note: If you don't want to use all modules, you can remove those that should not be part of your library. However, when doing so, make sure you use the utility
Get-CrossReferencedModuleListwith the switch parameterPrintLocalReferencesOnlyto check for any cross-module references. For example, you may find that when you'd remove the 'Microsoft.Network/privateEndpoints', that it is still referenced by some of the modules you may want to use (for example, 'Microsoft.KeyVault/vaults'). In those cases, make sure to not accidentally delete required references.
GitHub Repository
For GitHub, you have two choices depending on your planned repository visibility:
- In case of a public repository, we recommend to create a simple fork into the target organization. As the CARML source repository is public, a fork must be public too.
- If you need a private version instead, we recommend you create your target repository, download/clone the CARML repository (ref. 'how to' below) and upload the content to the created target repository
Note: This disables the feature to 'fetch' from the upstream (CARML) repository. As a result, you have to port upstream updates manually.
Azure DevOps Repository
For a private Azure DevOps git, we recommend you create your target repository, download/clone the CARML repository (ref. 'how to' below) and upload the content to the created target repository.
Note: This disables the feature to 'fetch' from the upstream (CARML) repository. As a result, you have to port upstream updates manually.
How to: Clone/download the repository
To save a local copy of the repository, you can either clone the repository or download it as a `.zip` file. A clone is a direct reference to the source repository which enables you to pull updates as they happen in the source repository. To achieve this, you have to have `Git` installed and run the following command: git clone 'https://github.com/Azure/ResourceModules.git'from a command-line of your choice (e.g., PowerShell).
If you just want to have a copy of the repository's content, you can instead download it in .zip format. You can do this by navigating to the repository folder of your choice (for example, root), then select the <> Code button on the top left and click on Download ZIP on the opening blade.
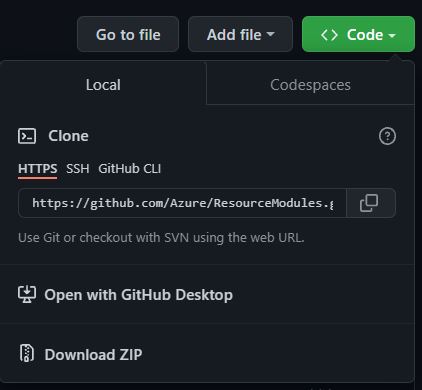
Alternatively, you can also do the same with a specific release by navigating to the releases page, scroll to the 'Assets' section at the bottom end of the release you'd like to get and download the packaged release (as it was when the release was created) with a simple click on the 'Source code' package (e.g., Source code (zip)) itself.

To update your copy with the latest changes in CARML, you would need to download, for example, the latest CARML release the same way you did during your initial setup, copy its folder content to your repository's location, and upload the changes.
As some files may have changed names or were removed in upstream CARML, you may further want to replace your entire folder to get to a 'clean' state. However, this is only recommended if you did not perform changes on any of the same files of upstream CARML. For reference, please refer to the changes shown by git.
For more information, see the Wiki section 'Fetching latest changes'.
CARML uses a single (settings.yml) file for configuring the CI environment, which is located in the root of the repository. To replicate the CI environment locally on your machine, and perform local modules tests and validations, you must install the (powershell-yaml) module from the PowerShell gallery by executing the following on your PowerShell CLI:
Install-Module -Name powershell-yamlTo configure the CI environment you have to perform several steps:
Note: While you can use the browser, we recommend that you clone all files to your local machine and update them using, for example, Visual Studio Code.
To lower the barrier to entry and allow users to easily define their own naming conventions, we introduced a default 'name prefix' for all deployed resources.
Note: This prefix is only used by the CI environment you validate your modules in, and doesn't affect the naming of any resources you deploy as part of any multi-module solutions (applications/workloads) based on the modules.
Each pipeline in CARML deploying resources uses a logic that automatically replaces "tokens" (i.e., placeholders) in any module test file. Tokens are stored in only a few central locations to facilitate maintenance (e.g., local settings.yml, repository secrets or variable groups).
To update the namePrefix, perform the following steps:
-
Open the
settings.ymlfile in the repository's root directory. -
Replace the value of the
localToken_namePrefixwith a different value:localToken_namePrefix: 'cntso'
Note: The value should be a 3-5 character long string like
cntso. Longer strings are not recommended as they may conflict with Azure resource name length restrictions.Note: The CI pipelines automatically removes the
localToken_prefix from the name when processing the tokens replacement.Note: We highly encourage you to use the 'Check namePrefix availability' script (see the documentation here) to check if the intended resource name will be available, based on the provided prefix.
For further information on the token replacement logic, please refer to the corresponding Token replacement section.
If you do not prefer to set the namePrefix locally for your CI environment. You can optionally set it as a GitHub Secret or add it to the ADO variable group as the key TOKEN_NAMEPREFIX and its value your name prefix value, and this is only applied if the localToken_namePrefix in the settings.yml is left empty.
While the concepts are the same, the configuration of the CI environment can differ drastically depending on the DevOps environment in which you want to register and run your pipelines. Following, you can find instructions on how to perform the remaining configuration in the corresponding DevOps environment:
GitHub
For GitHub, you have to perform the following environment-specific steps:
- 3.2.1 Set up secrets
- 3.2.2 Set up variables file
- 3.2.3 Enable actions
- 3.2.4 Set R/W Workflow permissions
To use the environment's pipelines you should use the information you gathered during the Azure setup to set up the following repository secrets:
| Secret Name | Example | Description |
|---|---|---|
ARM_MGMTGROUP_ID |
11111111-1111-1111-1111-111111111111 |
The group ID of the management group to test-deploy modules in. |
ARM_SUBSCRIPTION_ID |
22222222-2222-2222-2222-222222222222 |
The ID of the subscription to test-deploy modules in. |
ARM_TENANT_ID |
33333333-3333-3333-3333-333333333333 |
The tenant ID of the Azure Active Directory tenant to test-deploy modules in. |
AZURE_CREDENTIALS |
{"clientId": "44444444-4444-4444-4444-444444444444", "clientSecret": "<placeholder>", "subscriptionId": "22222222-2222-2222-2222-222222222222", "tenantId": "33333333-3333-3333-3333-333333333333" } |
The login credentials of the deployment principal used to log into the target Azure environment to test in. The format is described here. |
PLATFORM_REPO_UPDATE_PAT |
<placeholder> |
A private access token (PAT) with enough permissions assigned to it to push into the main branch. This PAT is leveraged by pipelines that automatically generate ReadMe files to keep them up to date. |
TOKEN_NAMEPREFIX |
cntso |
Optional. If you specify the name prefix token here, it is only applied if the localToken_namePrefix specified in the settings.yml is left empty. |
How to: Add a repository secret to GitHub
-
Navigate to the repository's
Settings.
-
In the list of settings, expand
Secretsand selectActions. You can create a new repository secret by selectingNew repository secreton the top right.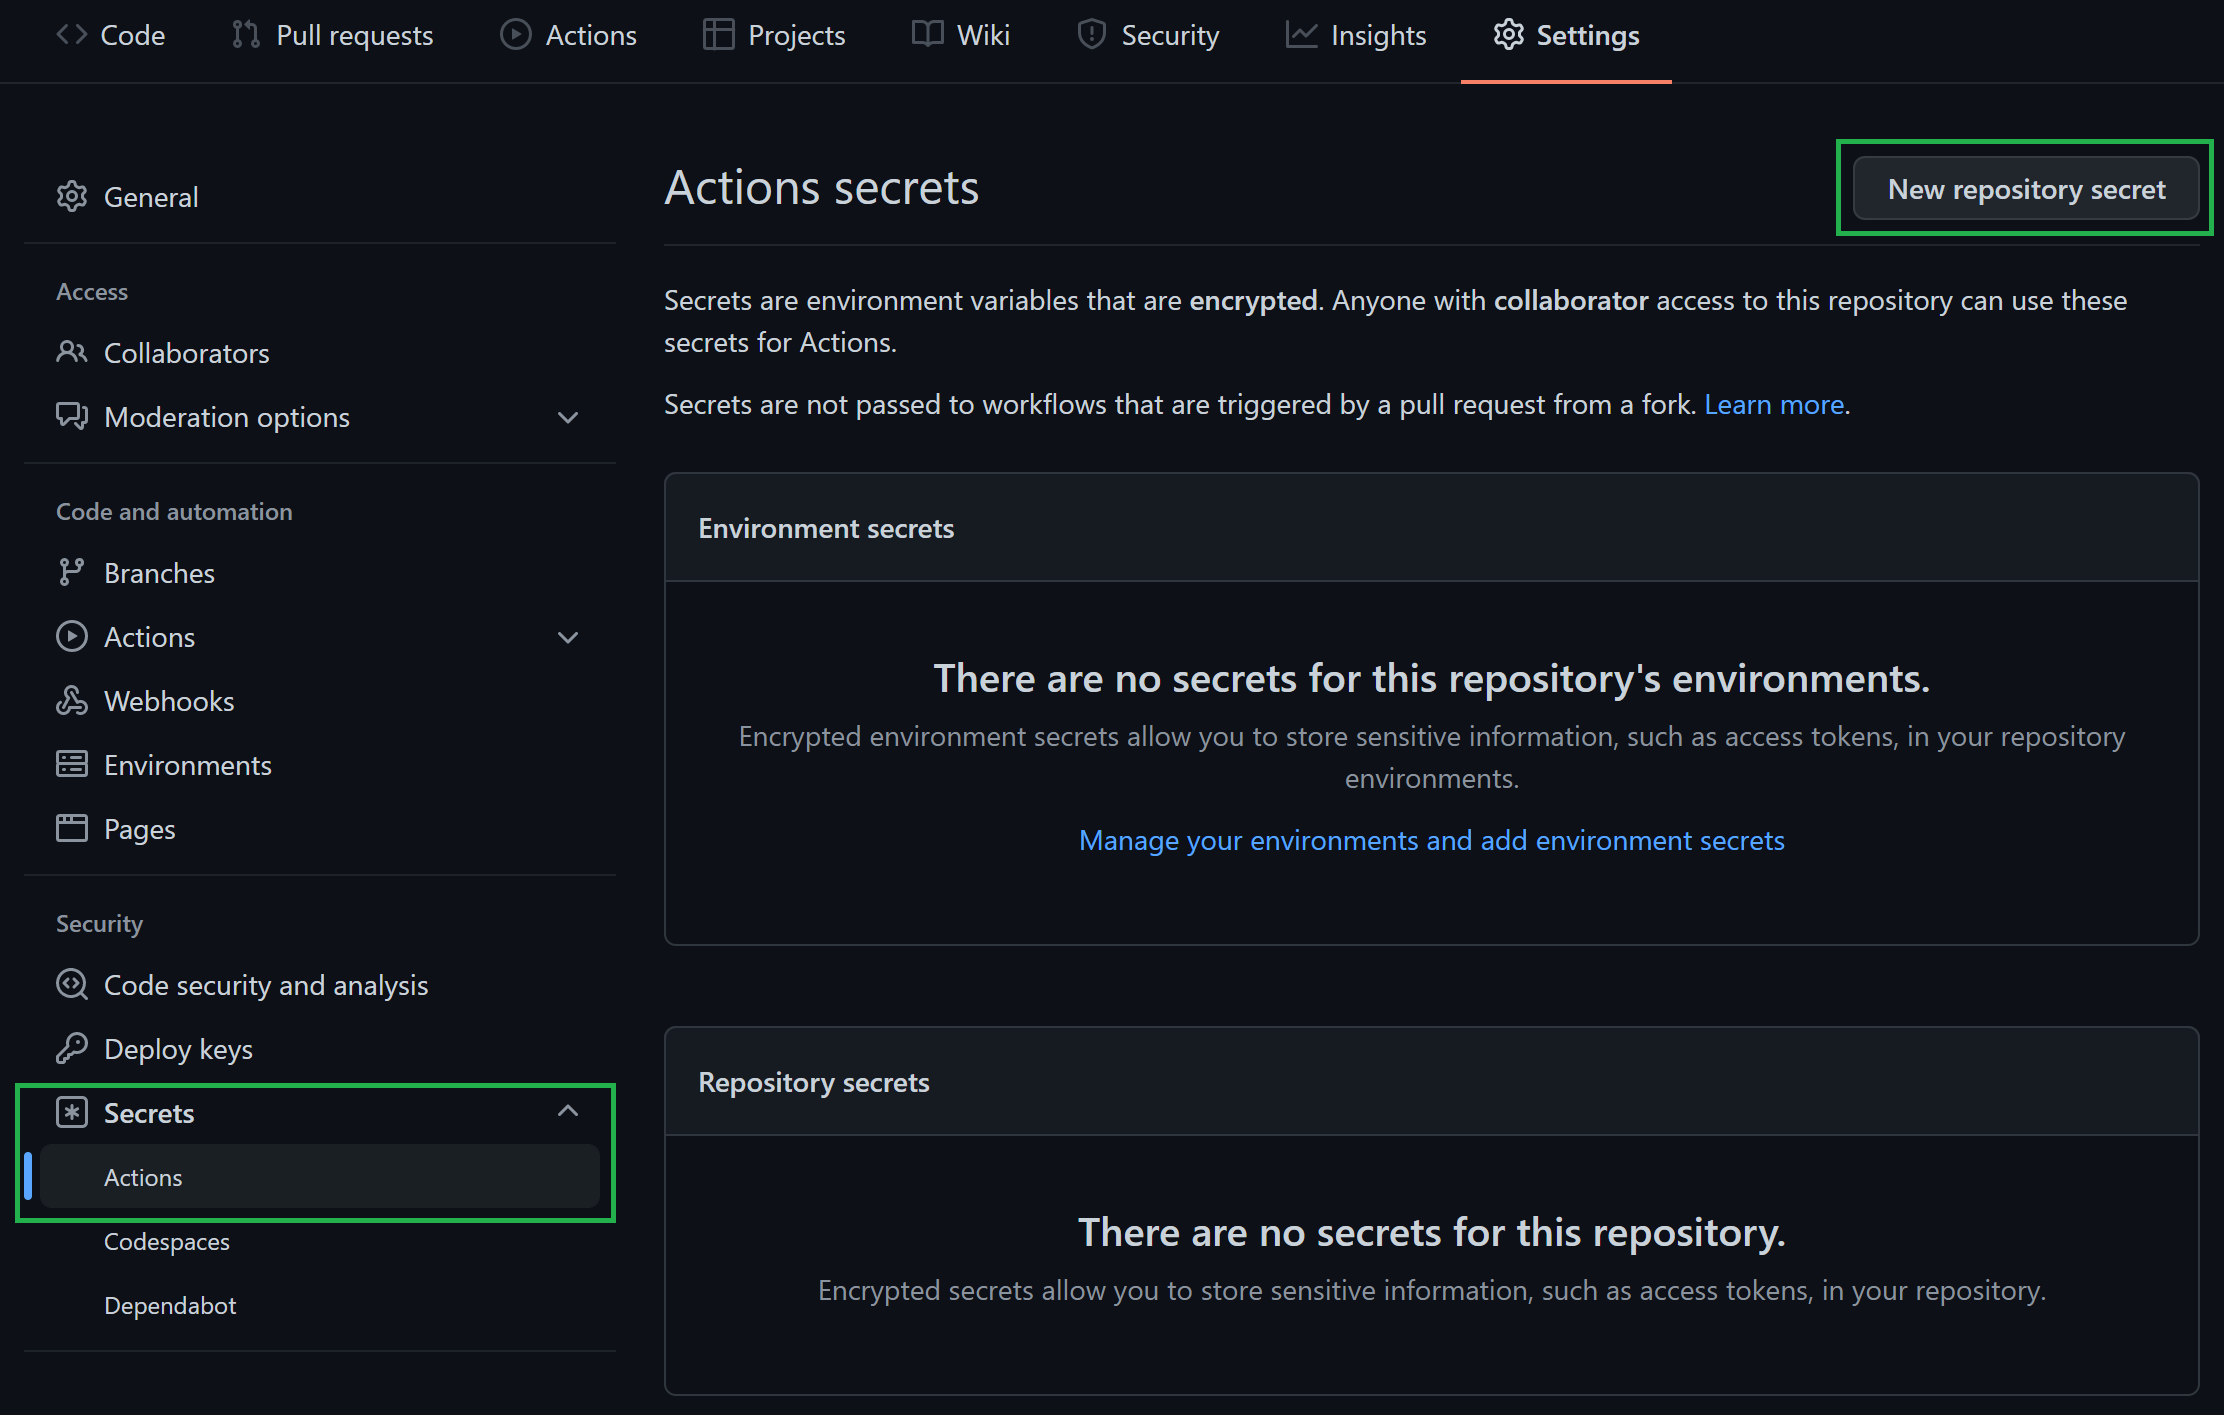
-
In the opening view, you can create a secret by providing a secret
Name, a secretValue, followed by a click on theAdd secretbutton.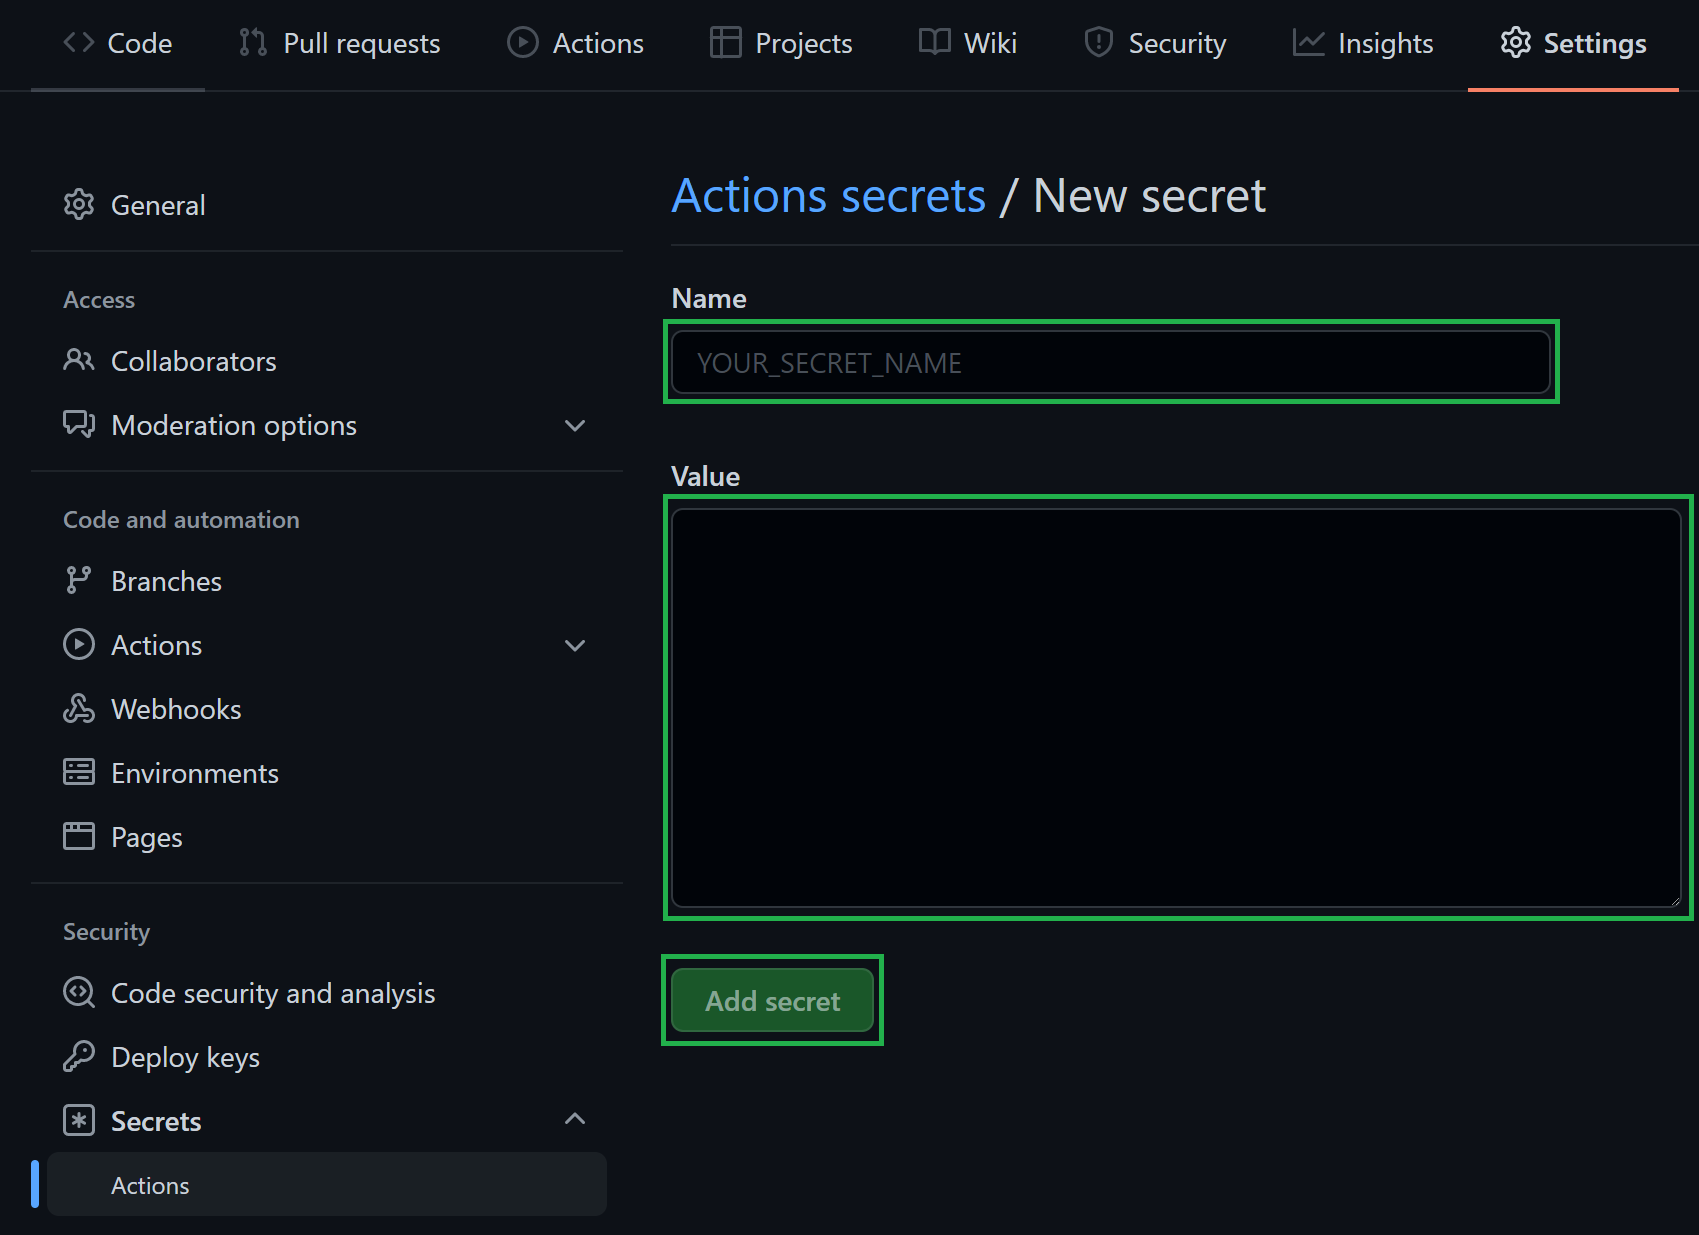
Special case:
AZURE_CREDENTIALS, This secret represent the service connection to Azure, and its value is a compressed JSON object that must match the following format:{"clientId": "<client_id>", "clientSecret": "<client_secret>", "subscriptionId": "<subscriptionId>", "tenantId": "<tenant_id>" }Make sure you create this object as one continuous string as shown above - using the information you collected during Step 1. Failing to format the secret as above, causes GitHub to consider each line of the JSON object as a separate secret string. If you're interested, you can find more information about this object here.
The primary pipeline settings file (settings.yml) hosts the fundamental pipeline configuration. In the file you will find and can configure settings such as:
General
| Variable Name | Example Value | Description |
|---|---|---|
location |
"WestEurope" |
The default location to deploy resources to and store deployment metadata at. If no location is specified in the deploying module test file, this location is used. |
General (publishing)
| Variable Name | Example Value | Description |
|---|---|---|
useApiSpecsAlignedName |
'false' |
Publish a module not using its folder path, but the matching name in the REST API (i.e., the classic naming). For example: bicep/modules/microsoft.keyvault.vaults.secrets instead of bicep/modules/key-vault.vault.secret. For more information, please refer to the Publishing guidelines. |
Template-specs specific (publishing)
| Variable Name | Example Value | Description |
|---|---|---|
publishLatest |
'true' |
Publish an absolute latest version. Note: This version may include breaking changes and is not recommended for production environments. |
templateSpecsRGName |
"artifacts-rg" |
The resource group to host the created template-specs. |
templateSpecsRGLocation |
"WestEurope" |
The location of the resource group to host the template-specs. Is used to create a new resource group if not yet existing. |
templateSpecsDescription |
"This is a module from the [Common Azure Resource Modules Library]" |
A description to add to the published template specs. |
templateSpecsDoPublish |
"true" |
A central switch to enable/disable publishing to template-specs. |
Private Bicep registry specific (publishing)
| Variable Name | Example Value | Description |
|---|---|---|
publishLatest |
'true' |
Publish an absolute latest version. Note: This version may include breaking changes and is not recommended for production environments. |
bicepRegistryName |
"adpsxxazacrx001" |
The container registry to publish Bicep templates to. NOTE: Must be globally unique. |
bicepRegistryRGName |
"artifacts-rg" |
The resource group of the container registry to publish Bicep templates into. It is used to create a new container registry if not yet existing. |
bicepRegistryRgLocation |
'West Europe' |
The location of the resource group of the container registry to publish Bicep templates into. Is used to create a new resource group if not yet existing. |
bicepRegistryDoPublish |
"true" |
A central switch to enable/disable publishing to the private Bicep registry. |
NOTE: If you plan to use the private container registry for Bicep, make sure to update its value in
bicepRegistryName, as it must be globally unique.
NOTE: If you are uncertain which publishing option to choose, this section may be of help.
Finally, 'GitHub Actions' are disabled by default and hence, must be enabled first.
To do so, perform the following steps:
-
Navigate to the
Actionstab on the top of the repository page. -
Next, select '
I understand my workflows, go ahead and enable them'.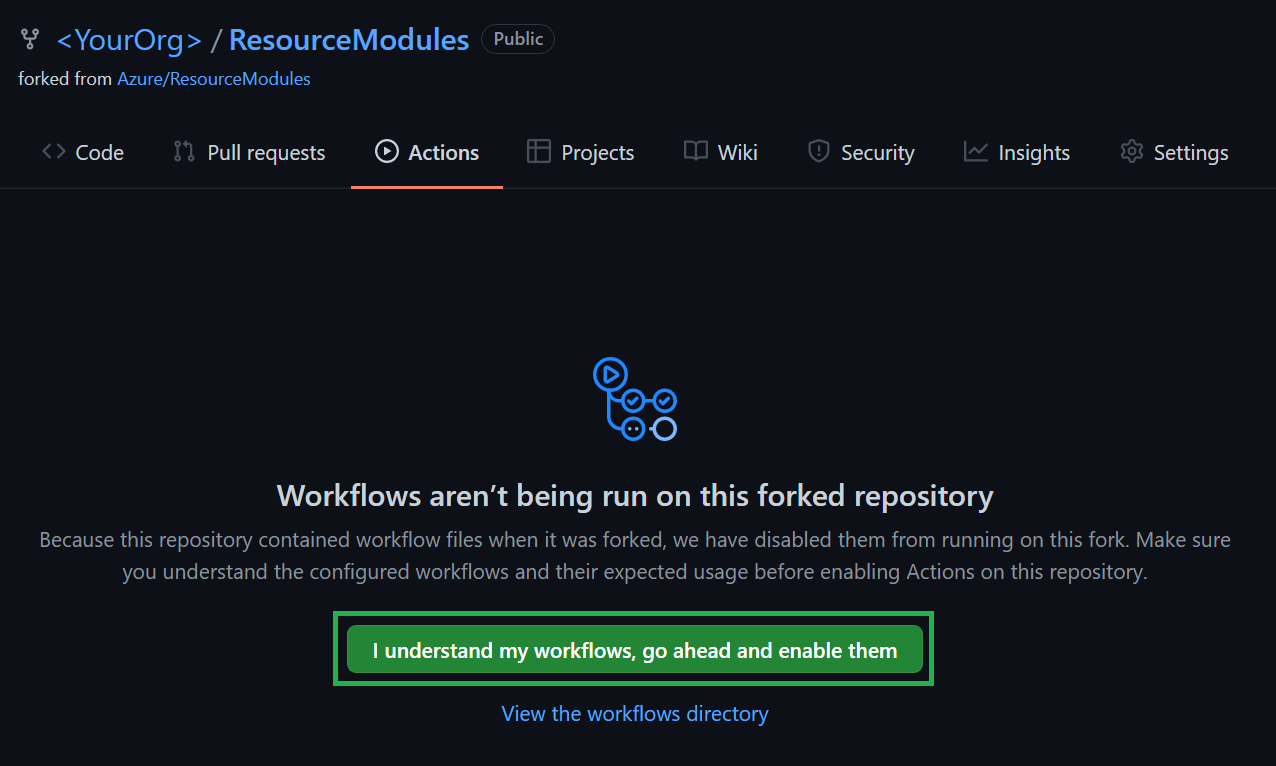
To let the workflow engine publish their results into your repository, you have to enable the read / write access for the GitHub actions.
-
Navigate to the
Settingstab on the top of your repository page. -
Within the section
Code and automationclick onActionsandGeneral -
Make sure to enable
Read and write permissions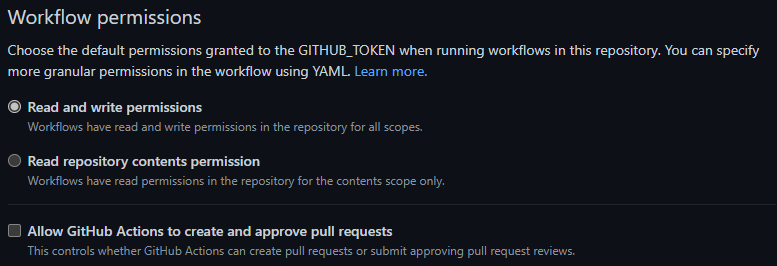
Azure DevOps
For Azure DevOps, you have to perform the following environment-specific steps:
- 3.2.1 Set up service connection
- 3.2.2 Set up secrets in variable group
- 3.2.3 Set up variables file
- 3.2.4 Register pipelines
- 3.2.5 Azure Artifacts Universal Packages
The service connection must be set up in the project's settings under Pipelines: Service connections (a step by step guide can be found here).
It's name must match the one configured as serviceConnection in the setting.yml file's 'General' section. For example: serviceConnection: 'CARML-Tenant-Connection'.
The variable group PLATFORM_VARIABLES must be set up in Azure DevOps as described here.
Based on the information you gathered in the Azure setup above, you must configure the following secrets in the variable group:
| Secret Name | Example | Description |
|---|---|---|
ARM_MGMTGROUP_ID |
11111111-1111-1111-1111-111111111111 |
The group ID of the management group to test-deploy modules in. |
ARM_SUBSCRIPTION_ID |
22222222-2222-2222-2222-222222222222 |
The ID of the subscription to test-deploy modules in. |
ARM_TENANT_ID |
33333333-3333-3333-3333-333333333333 |
The tenant ID of the Azure Active Directory tenant to test-deploy modules in. |
TOKEN_NAMEPREFIX |
<cntso> |
Optional. If you specify the name prefix token here, it is only applied if the localToken_namePrefix specified in the settings.yml is left empty. |
Make sure its name matches the group reference used in the module pipelines. For example
variables:
  - group: 'PLATFORM_VARIABLES'
Note: If you need to use different name than
PLATFORM_VARIABLES, make sure to search & replace all references with the new name. You will find these primarily in the module pipelines files in path.azuredevops/modulePipelines/*.yml
The primary pipeline settings file (settings.yml) hosts the fundamental pipeline configuration. In the file, you will find and can configure information such as:
General
| Variable Name | Example Value | Description |
|---|---|---|
location |
'WestEurope' |
The default location to deploy resources to. If no location is specified in the deploying module test file, this location is used. |
serviceConnection |
'Contoso-Connection' |
The service connection that points to the subscription to test in and publish to. |
General (publishing)
| Variable Name | Example Value | Description |
|---|---|---|
useApiSpecsAlignedName |
'false' |
Publish a module not using its folder path, but the matching name in the REST API (i.e., the classic naming). For example: bicep/modules/microsoft.keyvault.vaults.secrets instead of bicep/modules/key-vault.vault.secret. For more information, please refer to the Publishing guidelines. |
Template-specs specific (publishing)
| Variable Name | Example Value | Description |
|---|---|---|
publishLatest |
'true' |
Publish an absolute latest version. Note: This version may include breaking changes and is not recommended for production environments. |
templateSpecsRGName |
'artifacts-rg' |
The resource group to host the created template-specs. Will be automatically created if not yet existing in the target subscription. |
templateSpecsRGLocation |
'WestEurope' |
The location of the resource group to host the template-specs. Is used to create a new resource group if not yet existing. |
templateSpecsDescription |
'This is a module from the [Common Azure Resource Modules Library]' |
A description to add to the published template specs. |
templateSpecsDoPublish |
'true' |
A central switch to enable/disable publishing to template-specs. |
Private Bicep registry specific (publishing)
| Variable Name | Example Value | Description |
|---|---|---|
publishLatest |
'true' |
Publish an absolute latest version. Note: This version may include breaking changes and is not recommended for production environments. |
bicepRegistryName |
'adpsxxazacrx001' |
The container registry to publish Bicep templates to. NOTE: Must be globally unique. Will be automatically created if not yet existing in the target subscription. |
bicepRegistryRGName |
'artifacts-rg' |
The resource group of the container registry to publish Bicep templates to. Is used to create a new container registry if not yet existing. Will be automatically created if not yet existing in the target subscription. |
bicepRegistryRgLocation |
'West Europe' |
The location of the resource group of the container registry to publish Bicep templates to. Is used to create a new resource group if not yet existing. |
bicepRegistryDoPublish |
'true' |
A central switch to enable/disable publishing to the private Bicep registry. |
Universal packages specific (publishing)
| Variable Name | Example Value | Description |
|---|---|---|
vstsFeedName |
'carml' |
The name of the Azure DevOps universal packages feed to publish to. Must be created before running the pipelines. |
vstsFeedProject |
'$(System.TeamProject)' |
The project that hosts the feed. The feed must be created in Azure DevOps ahead of time. |
vstsFeedToken |
'$(System.AccessToken)' |
The token used to publish universal packages into the feed above. |
artifactsFeedDoPublish |
'true' |
A central switch to enable/disable publishing to Universal packages. |
NOTE: If you plan to use the private container registry for Bicep, make sure to update its value in
bicepRegistryNameas it must be globally unique.
NOTE: If you are uncertain which publishing option to choose, this section may be of help.
To use the pipelines that come with the environment in Azure DevOps, you need to register them first. You can either do this manually, or, run the utility Register-AzureDevOpsPipeline we provide in utilities/tools/AzureDevOps. For further information, please refer to the corresponding documentation.
This section will explain what is required to publish the modules to Azure Artifacts Universal Packages. It will also assume you are publishing from Azure DevOps Pipelines.
- An Azure DevOps organization and project
- An Azure DevOps artifacts feed
Note: The official guidance to set up a feed can be found here. The default feed name is
carmlas configured in thesettings.ymlfile's variablevstsFeedName. Update the value here if you want to use a different name, but make sure it matches the name of the artifact feed created in Azure DevOps.Note: It's also very important that the feed's 'Permissions' (Artifact Feed -> Feed settings -> Permissions) are set up so that the project's 'Build Service' has at least the role 'Contributor' to be able to publish artifacts (ref).
- An Azure DevOps project to host the artifact feed
Note: There are a couple options to consider when setting up an Azure Artifact feed. For example, organization-scoped feeds vs project-scoped feeds. Please see what option suits your needs by reviewing the feeds document first.
- If you chose the feed to be project-scoped, you will need the Project Build Service account to have
Contributoraccess to publish to the Azure Artifacts feed. To set this, follow the Pipeline permission steps.
Each ./azuredevops/modulePipelines YAML pipeline invokes the /.azuredevops/pipelineTemplates/jobs.publishModule.yml template. This YAML template contains a method to Publish module to artifacts feed via the utilities\pipelines\resourcePublish\Publish-ModuleToUniversalArtifactsFeed.ps1 script, which ultimately publishes the modules.
In order to successfully deploy and test all modules in your desired environment, some modules require resources to be deployed beforehand.
Those resources are generally deployed by the module test files before the module to validate, so that you don't need to worry about setting up dependencies for each test and clean them up afterwards.
In special cases, manual actions may be required to provision certain resources whose deployment is not covered by the module test files. In the following, you can find an overview of which modules require special attention before being validated.
To successfully deploy the sites module using the functionAppCommon/main.test.bicep test, you need to create an Azure Active Directory App with its API endpoint enabled (e.g., api://<app id>) and add a secret. The secret value needs then to be stored in a Key Vault secret.
Finally, the elements described above must further be configured in the following files:
| File | Parameter | Notes |
|---|---|---|
modules/Web/sites/.test/common/main.bicep |
appSettingsKeyValuePairs.EASYAUTH_SECRET |
Key Vault secret URI without version (e.g., 'https://Test-KeyVault.vault.azure.net/secrets/aBcDeFghIjK69Ln') |
modules/Web/sites/.test/common/main.bicep |
authSettingV2Configuration.identityProviders.azureActiveDirectory.registration.clientId |
App ID from the Azure Active Directory App (e.g., '11111111-1111-1111-1111-11111111111') |
modules/Web/sites/.test/common/main.bicep |
authSettingV2Configuration.identityProviders.azureActiveDirectory.validation.allowedAudiences |
API endpoint from the Azure Active Directory app (e.g., 'api://11111111-1111-1111-1111-11111111111') |
Note that in case you don't want to use Bicep, you always have the option to use the utility ConvertTo-ARMTemplate we provide in path utilities/tools to convert the repository to an ARM-only repository. Due to the way Bicep works and the CI environment is set up, you should be able to use it with ARM templates in the same way as you would when using Bicep. For further information on how to use the tool, please refer to the tool-specific documentation.